How to speed up a web page without going crazy
If you are willing to improve Core Web Vitals on WordPress (and webpage speed as well), wait a minute before migrating to another server that promised you miracles, or crashing your website trying to configure a caching plugin.
There are some other SEO actions that can help your website to rank better, with no need for revolutionary changes.
Let’s start by optimizing the load time of your webpage.
The faster your page loads, the less time your visitors have to wait. And when visitors wait for too much time, they tend to bounce off.
This means that the load time of your page is directly proportional to your bounce rate.
Let’s see how we can speed up a website: the first step is to know its speed.
How to know how fast your website is: use Google Page Speed Insights
Page Speed Insights gives you an overview of the overall speed measured through Core Web Vitals, along with some tips to improve them. You can start their optimization right along, as Core Web Vitals are a ranking factor.
Remember that Page Speed Insights gathers its data from the real visits that user do. These data are available in the Chrome User Experience Report (aka CrUX), and from real-time values coming directly from Chrome’s API.
CrUX data are refreshed every four weeks.
On the other hand, if the website you want to evaluate has very low traffic (hence CrUX has no data), you may have results that do not reflect the real situation.
How to have some SEO insights to improve your pages: use Google Lighthouse
Lighthouse acts by simulating a visitor on a mid-tier mobile device (Moto G4) or desktop. It’s an open-source tool you can find in Chrome DevTools (right-click on the page you want to assess, then Inspect > Lighthouse).
Lighthouse uses lab data only, to measure performances and evaluate some SEO best practices. By visiting a webpage and launching it, you’ll see a brief summary of performances, along with several SEO suggestions about improvements to do on that page.
Use Lighthouse in an Incognito window, and disable Chrome extensions.
Another reliable tool is Webpage Test.
Write the URL of the page you want to assess, then select a location and press “Start test”.
You’ll see results in half a minute, more or less. Moreover, Webpage Test lets you adjust several parameters, like browser, connection speed, location (important to test the speed from various places)… All from the “Advanced settings” menu.
By signing up for a free account, you can perform as many tests as you want and see your test history.
However, these tools won’t tell you exactly which steps you’ll have to take to improve Core Web Vitals for WordPress… Let’s see some practical suggestions to start having better performances and rankings.
How to improve Largest Contentful Paint (LCP)
LCP measures the time needed to display the largest element in the viewport (could be an image, a video, a text block or a background…). This implies that to improve the value of this parameter, you need:
a good response time from the server delivering the content;
the minimum possible amount of blocking resources;
a fast loading time for all the resources in the viewport.
Usually, the largest element of the viewport is a background image, and it often takes a bit too much to load. To make it faster, the first thing we need to do is upload properly resized images.
This is surely a good thing to do, as long as you keep an acceptable quality, but many times it’s not enough to solve the issue.
You can apply these two techniques:
- set explicit width and height for the element: this will force the browser to quickly allocate the space for the image in the viewport.
- Set a background colour for the element to load: this background will become the largest element. It will be a lot quicker than an image to load. Plus, users will see colour and they’ll know that something is going to appear right there.
Also, when it comes to image sizing, a plugin can help avoiding site authors to upload excessively big files.
There are many to choose from, just look for “image optimization” in the WP repository.
Some offer WebP conversion, Lazy Load and bulk resizing for free, while others integrate with popular CDN providers. The Premium versions have usually better compression and dedicated CDN access for the fastest delivery, among several other options.
How to improve First Input Delay (FID)
FID is about page interactivity. It measures the time from the first user’s interaction with the page (a tap, a click…) to the moment the browser responds to it. It requires the user’s input, so you can’t measure it with tools, but you can approximate it to the TBT (Total Blocking Time).
Now you need to know what the heck Total Blocking Time is, and how to keep it as short as possible.
TBT is not the same as FID: TBT measures the time the page needs to be interactive, but it does not take into account any user input.
Shorten Total Blocking Time
Have a look at the performance of this page measured with Lighthouse (it’s a post from cnn.com).
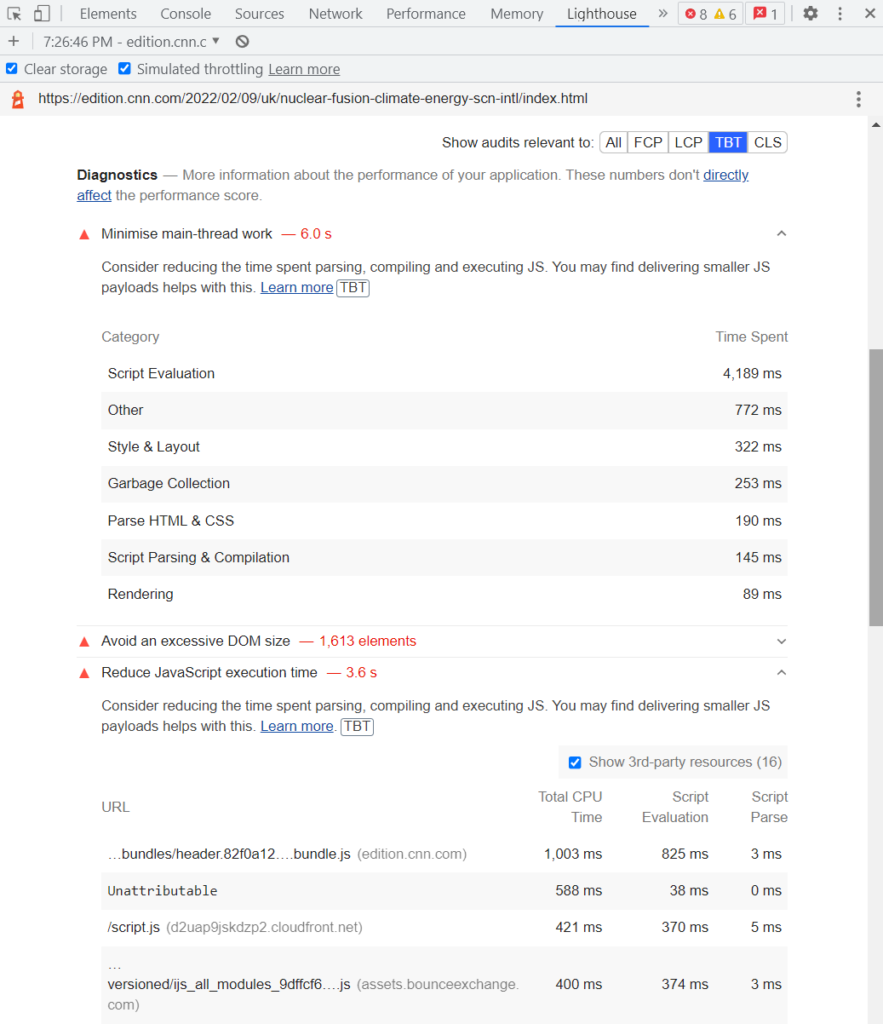
JavaScript execution time is quite long, as you can see.
How to defer Javascript (and other blocking resources)
Indeed, you don’t want to load the blocking resources as soon as the user clicks on the page, but only when they’re needed.
The ideal situation would be to load the blocking resources when the page is ready to be used, which is what the defer attribute is for.
Be cautious with jQuery: many other common scripts rely on this library. You could break your website by loading it after its dependencies.
The async attribute downloads JavaScript while still parsing the HTML, then pauses the HTML parsing to run the JavaScript.
So, the defer attribute comes in handy here; it does too download the JavaScript while still parsing the HTML, but waits for it to run until the HTML parsing is finished.
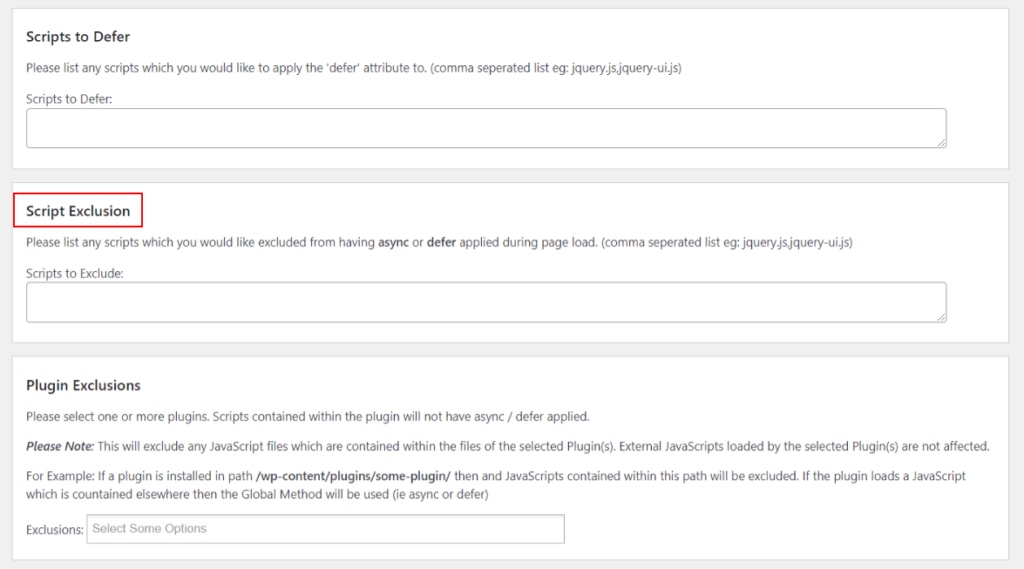
There are many plugins that help you to put the scripts of your website on an “async/defer list”; the first one is easy to use and works on JS. The second has options to handle also CSS, fonts and images, while the last one is a little more complex for a non-experienced user.
Async JavaScript
Async JavaScript offers an easy way to speed up JavaScript parsing. It’s developed by the same developer behind Autoptimize, the second plugin in this list.
To get started, you can install and activate the plugin from the WordPress.org repository. Then, go to Settings → Async JavaScript to configure it. From there, you can enable the plugin’s features and choose between async and defer.
If you are unsure, try first applying Quick Settings and check everything is OK before going further.

You can find some more settings by scrolling below:
Autoptimize
Autoptimize is another well-known and appreciated plugin. Its purpose is to minify and concatenate JavaScript, HTML and CSS files, creating one single file for each kind.
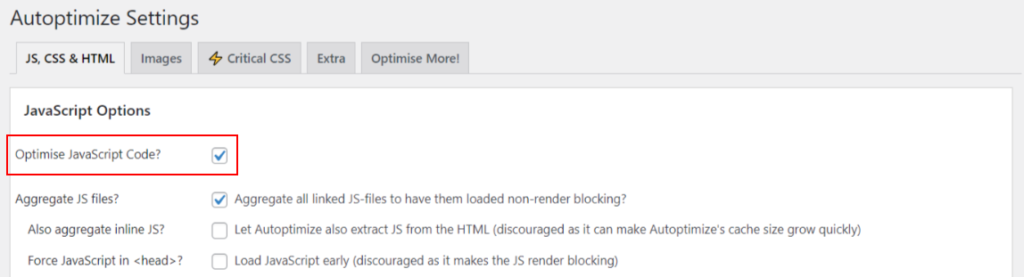
After installing and activating, go to Settings →Autoptimize. You’ll find many features: focus on the JS, CSS & HTML tabs.
Here, check “Optimise JavaScript Code”, “Optimise CSS Code” and “Optimise HTML Code”, as shown below. Leave the default, then save: even these basic options can dramatically improve Core Web Vitals results on WordPress.


How to optimize Content Layout Shift (CLS)
Layout shifting occurs when page content moves without any user interaction.
A common example is advertisements that load late, which you have probably already encountered around the web. Maybe you started reading the text and then saw it snap, “pushed” down by an ad that suddenly appeared in front of you.
The Cumulative Layout Shift measures all these movements that occur on a page and puts them in a score that goes from 0.1 to 0.

A score higher than 0.25 indicates many position changes (not good), while a score lower than 0.1 indicates few (good). A score of zero means that the page in question has no problems moving the layout: the optimal situation!
As you can imagine, letting the elements move is quite annoying: users risk inadvertently clicking on ads or buttons, while, perhaps, they wanted to select another point. These issues affect your audience’s user experience (UX).
Unfortunately, a high Cumulative Layout Shift score has a bad impact on SEO. Starting with the Google Page Experience update, your site’s Core Web Vitals scores are a ranking factor, which means that any issues with the CLS also affect your ranking. Improving Core Web Vitals also means improving CLS, hence it means improving UX.
How to find out the CLS score of the site
Let’s start with the “usual” PageSpeed Insights: enter the URL you are interested in, and start the analysis: once the results arrive, scroll down until you find the value of Cumulative Layout Shift.
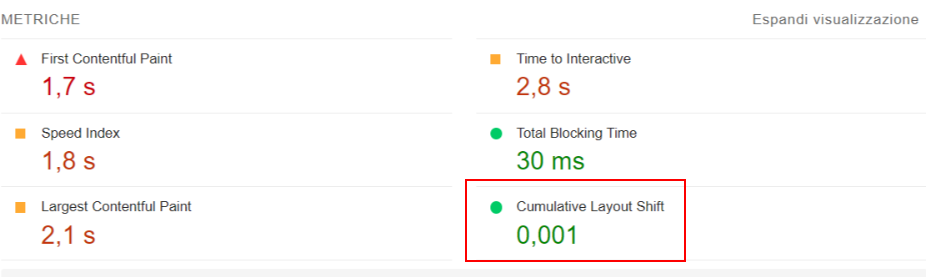
According to Google’s Web Dev indications, we have a good value here, but if you have a value higher than 0.1, it is better to intervene.
How to optimize CLS
Assign explicit dimensions to images, videos, ads
Always assign the dimensions (width – height) to images, videos and ads: the spaces they will occupy will already be drawn by the browser before the loading takes place, avoiding generating movements and layout changes.
Learn some best practices to optimize CLS on Google’s Web Dev website.
The WordPress editor inserts the size of the images you add to the Media library (you can see it from the backend); you can also change them while maintaining the original ratio.
Position page elements
Page elements should not change position once drawn, because they may move others.
Optimize web fonts
External fonts are not always loaded before the text is displayed.
This can cause a layout shift as a result of:
• FOUT (Flash Of Unstyled Text, when the browser displays unstyled text in its default font).
• FOIT (Flash of Invisible Text, when the browser keeps text hidden until it has finished downloading the font).
The change of style must be kept to a minimum. To limit the impact of fonts on the CLS is a good rule to:
- load only the fonts and subsets you need.
- Add
font-display:swapto a font-face in CSS (Google Fonts already does this in its snippet). - Use
rel="preload"for font URLs.
Otherwise, you can install the fonts locally on your domain.
Note that most WordPress performance optimization plugins offer options to speed up font loading, so those who use them should not need to apply the above indications manually.
Optimize Ads
Ads can cause multi-step layout shifts when:
- ad container is placed in the DOM;
- the container is resized;
- the ad is a different size than the container and it resizes the container itself.
It is good to assign explicit dimensions to the <div> that contain the ads (from CSS, you can establish them in advance). This system works very well in the case of small ads or ads with similar sizes.
Assigning measures for the largest size of the ads is a valid alternative but, in this case, there will remain an empty space around in case of smaller ads.
You can give an average size to the slot: you’ll have space left in case of a small ad, and there will be a minimum shift in the case of a larger one, but you’ll still reduce CLS. To understand what works best in a given situation, the solution is always to carry out tests.
Be careful while using fluid slots, as they resize to fit their content and every fluid element causes shifts.
Dynamic content
Privacy notices, sign-up forms, notification bars… These elements can adversely affect the Cumulative Layout Shift if they are not triggered by user interactions.
If they are in the above-the-fold content, you can:
- reserve space for them via CSS, as for ads;
- activate them only after user interaction.
Remember, however, that the CLS is not only evaluated on content placed above the fold but is calculated over the entire page lifespan.
Optimization plugins previously shown will help you in CLS optimization as well as the other Core Web Vitals. First of all, though, you need to pay attention in assigning correct CSS rules to elements that could trigger a shift.
There are indeed more techniques that help when it comes to improving Core Web Vitals optimization. Unless you’re in a staging environment, I suggest you stick to the basic options.
More advanced users obtain higher scores by tweaking elements that require a deeper knowledge of WordPress and some coding skills… But everybody can speed up a WordPress page and improve performance with the right plugins (and the right settings).